Beginning iOS programming (Post 1) – changing the iPhone’s screen color
This is part of a series of posts building the skills needed for Native iOS Prototyping.
Changing the iPhone’s screen color #
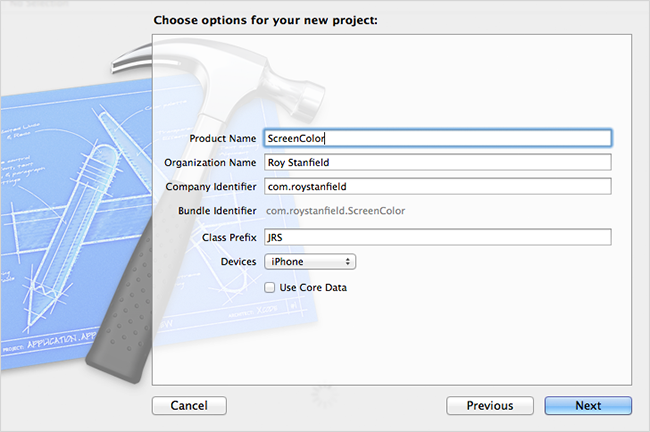
Press Shift + Cmd + N to create a new Xcode project. And select Empty Application from the project menu.

Add a title for your project in the Product Name field. None of the other fields matter all that much. Company Identifier should be your website address with .com first. Class Prefix should 3 capital letters – possibly your initials. Device should be set to iPhone.
Then click Next. Now you’ll see the Xcode workspace. Obj-C files are split into both a header file (marked with a .h extension) and an implementation file (marked with a .m extension). The header file is for declaring the names of properties and methods while the implementation file is where the properties and methods are defined and used. The AppDelegate.m is the first file loaded by our app that we can write our own code into. So click on the AppDelegate.m file and take a look at the code paying special attention to the chunk of code around line 13 to line 20. This is our first look at a method (a function declared inside of a class).
This method is named application:didFinishLaunchingWithOptions:. When you run your app the boilerplate code will run this method and execute the code block inside of the curly braces.
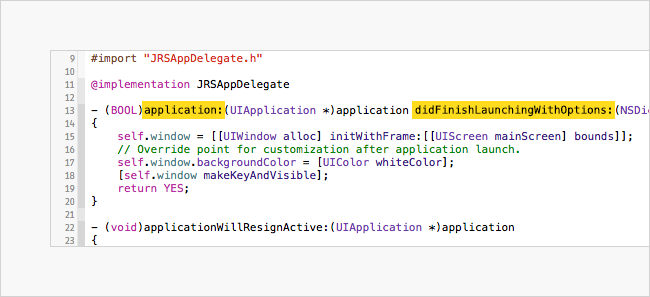
Take a look at the block of code inside the curly braces. Notice the line that reads:
self.window.backgroundColor = [UIColor whiteColor];
On the left side of the equals sign self.window has a property called backgroundColor. On the right side of the equals sign is our first Objective-C message. Messages are contained in braces. The first half of the message contains a class name and the right half contains a method call. whiteColor is a special kind of method that doesn’t need any options appended to the method call because the options have been predefined. In that case we call the method a convenience method and the predefined options create a white color. So here we’re setting the self.window backgroundColor property to white.
Now select an iPhone simulator by clicking to the right of the SimpleView name in the upper left side chrome in Xcode. A dropdown will show allowing you to choose among available simulators. Run the app by pressing the play button in the top right or pressing Cmd + r.
You should see the simulator load a white iPhone screen. Something like the one pictured.

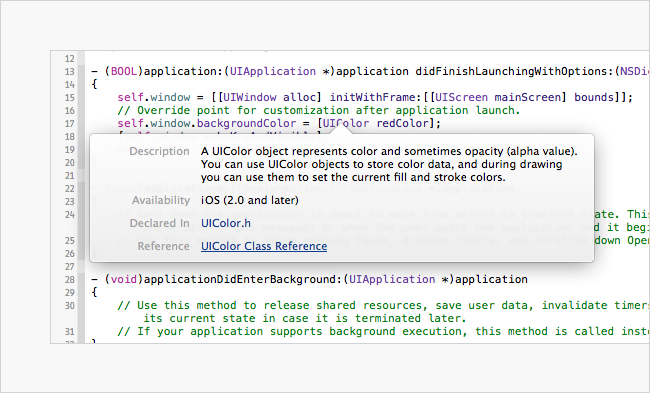
So what other colors are available? Hold down option and move your mouse. The pointer will turn into a question mark. Mouse over and click the UIColor text in the message we’ve been looking at. You’ll see a popup. Click on UIColor Class Reference in the popup.
You will now get the UIColor Class Reference in the documentation browser. Scroll down to Creating a UIColor with Preset Component Values and you’ll see a list of class methods / connivence methods with predefined color options.

We should feel free to try any of them so let’s make a change by setting the window to a new color. How about red? Bam!
self.window.backgroundColor = [UIColor redColor];

But lets take it one step further by creating our own colors that are not predefined. Scrolling back up in the documentation I can see another method called colorWithRed:green:blue:alpha:.

Click on the link to colorWithRed:green:blue:alpha: and the documentation browser will scroll down to the details which look like the following.
+ (UIColor *)colorWithRed:(CGFloat)red green:(CGFloat)green blue:(CGFloat)blue alpha:(CGFloat)alpha
colorWithRed accepts a (CGFloat)red argument. CGFloat is the parameter’s type for the red option. The documentation says “The red component of the color object, specified as a value from 0.0 to 1.0.” To get an RGB color from an application like Photoshop to be between 1 and 0 take the Red value (0-255) and divide it by 255. So to make the screen a custom yellow color we have:
self.window.backgroundColor = [UIColor colorWithRed:255/255.f green:220/255.f blue:30/255.f alpha:1];

Great! Next we’ll try out custom views and custom scroll views. Grab the project files on GitHub. Stay tuned!